The importance of traceability for flow measurement calibration facilities

Flow meters used in a variety of applications are regularly taken out of service for calibration, which provides performance traceability through physical measurement standards, protocols and guidelines. Calibration of flow meters is an expensive process, but accuracy is vital, as the traceability chain and associated accreditation ensure that the flow meter is being calibrated effectively.
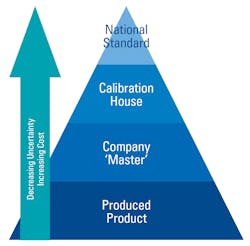
Traceability is an important concept and applies to a number of industries. For metrology and calibration, “traceability” involves being able to trace your calibrated device to its reference device or process, which can be tracked to its calibration source, and all the way to a national standard. This is typically pictured as a “chain” or “pyramid” of traceability (Figure 1), where the accuracy improves as you rise up the pyramid stages until the national standard is reached. You will therefore probably find words like “traceable to national standards” on your calibration certificates.
Take a set of scales used to weigh vegetables in the supermarket for example. Those scales are checked against a mass “transfer standard” of the calibrating company, who will have a “company master” in their laboratory that calibrates the “transfer standards.” The company master will be calibrated somewhere else and as such, calibrations can be traced all the way to the national standard. In 2019, the international standard for the kilogram was changed to relate it to fundamental physical constants of the second and meter which is another example of the evolution of measurement systems and the requirement for better accuracy.
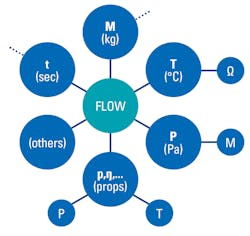
The calibration of day-to-day weigh scales can appear simple where a known mass is placed on the scales and a measurement taken. However, for a derived quantity (say, oil volumetric flowrate measured by a flow meter on a production platform), things become complicated quite quickly. A number of measurements are now required: mass, time, temperature, pressure, fluid properties and others ( REF _Ref476235067 \h \* MERGEFORMAT Figure 2). Each of these quantities require measurement, so full traceability of a flow meter calibration requires an extended family of pyramids. Your single certificate can grow exponentially into a traceability tree.
Minimize inaccuracy
Governments build and support National Measurement Institutes (NMIs) to protect their national standards and support industry. Get measurements wrong and commerce is ultimately affected. If a country does not support its own national standard, then it may not control the foundations of its commerce and harbor an unhealthy dependence on foreign services. If traceability is overlooked, then there is no impartial verification, and the chain is broken. This results in penalties such as indefensible meter performance (in our flow example), reduced customer or stockholder confidence and profit volatility.
With this in mind, what happens if your flow measurements are incorrect? Can you estimate the cost of inaccuracy? While you cannot be 100% accurate, consider what is acceptable to you and to your customers. The traceability chain will help you understand and achieve this.
Building the chain
All measurements are approximate and have an inherent measurement uncertainty. It is this specification of measurement uncertainty that links the traceability chain together and each tier of the traceability pyramid decreases the measurement uncertainty. This scientific evidence enables you to record your result as being as accurate to a known confidence level.
The traceability chain’s strength is in the evidence of solid fact; unbiased results produced by consistent procedures and skilled engineers, who have been vetted by independent quality auditors. Traceability is the story of anonymous team effort and professionalism across this chain of numerous businesses, to deliver trusted confidence. While this confidence is ensured by the use of accredited services, the chain is only as strong as the weakest link.
The quality system
An organization must have a robust quality system in order to support a functional traceability scheme. For example, your calibration certificate should quote a relevant standard, such as "accredited to ISO/IEC 17025.” In this case, 17025 is a very practical standard: surprisingly short, but far-reaching. It emphasises the management requirements for test and calibration businesses, as well as the technical considerations, to such an extent that there is a substantial overlap with the ubiquitous ISO 9001.
For regions of the world which do not support the ISO system, then a Mutual Recognition Agreement (MRA) can be reached whereby the different national standards are balanced and equivalent merits are identified. Again, this allows international trade and universal standards.
Traceability cornerstones
Audit, budgets (in the implementation of an uncertainty budget) and calibration are the cornerstones of traceability (the ABC’s).
Accreditation services are controlled by governments while their auditors ensure that the advertised calibration service (Schedule) is valid and maintained. Such audits are a critical element of the traceability chain with your business earning accreditation to a specified standard. From a measurement point of view, we use uncertainty budgets (UB) to numerically determine the effects of practical precision. UBs are at the heart of traceability. These define the calibration and measurement capability (CMC) of a calibration house or principal institute. The CMCs are published internationally and offer fair trade selection of supplier.
Adding trust
Traceability provides the trust element of each measurement leading to your final calibration result. This is achieved through the measurement audit, where evidence is produced, and the facts certified in the results. Engineering science and its development is only possible when measurements are understood, uncertainties judged and acceptance criteria are agreed.
While your calibration certificate may only comprise of a few pages, it represents a solid grounding in measurement confidence. Indeed, you may not have previously appreciated the inclusion of the word “traceability” within your certificate’s small print, but this single word gives the calibration result gravitas. If traceability is overlooked, then there is no impartial verification and the chain is broken, resulting in penalties such as poor meter performance with reduced customer and stakeholder confidence. To achieve flow traceability is a continual, but worthwhile challenge. This will help the UK’s progress to net zero, enhance clean growth and facilitate global standards that are well suited to the UK’s commercial success in the global marketplace.
Dr. Chris Mills is a Senior Consultant Engineer at TÜV SÜD National Engineering Laboratory, a world-class provider of technical consultancy, research, testing and program management services. Part of the TÜV SÜD Group, the organization is also a global center of excellence for flow measurement and fluid flow systems and is the UK’s Designated Institute for Flow Measurement.
About the Author
Chris Mills
Dr. Chris Mills is a consultant engineer at TÜV SÜD National Engineering Laboratory, a provider of technical consultancy, research and development, calibration and testing services. Part of the TÜV SÜD Group, the organization is a global center of excellence for flow measurement and fluid flow systems and is the UK’s Designated Institute for Flow Measurement. Mills is a chartered chemical and process engineer with over 12 years of experience in flow measurement. He has practical experience with calibrating and operating flowmeter technologies: Coriolis, positive displacement, ultrasonic, turbine and differential pressure devices. Mills recently completed his engineering doctorate with Coventry University on laminar-turbulent transitional flow measurements.
